Simplest Way to Create Excel Add-in

Complete Excel VBA Course

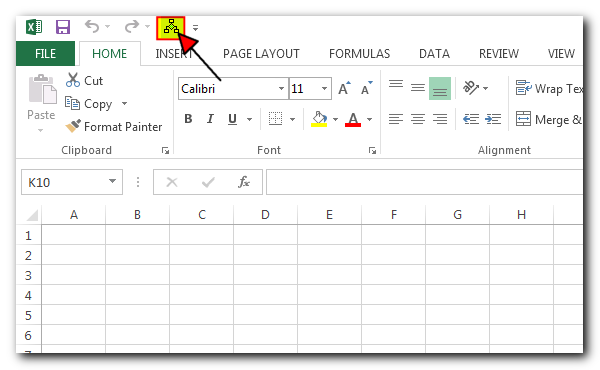
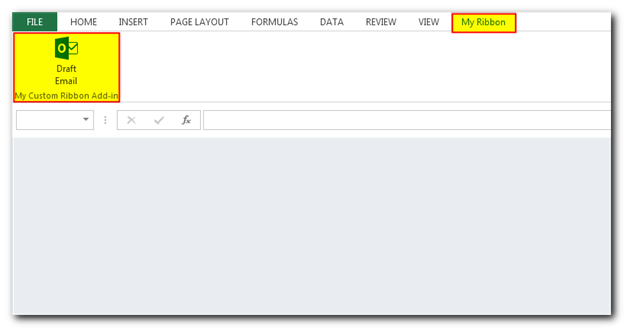
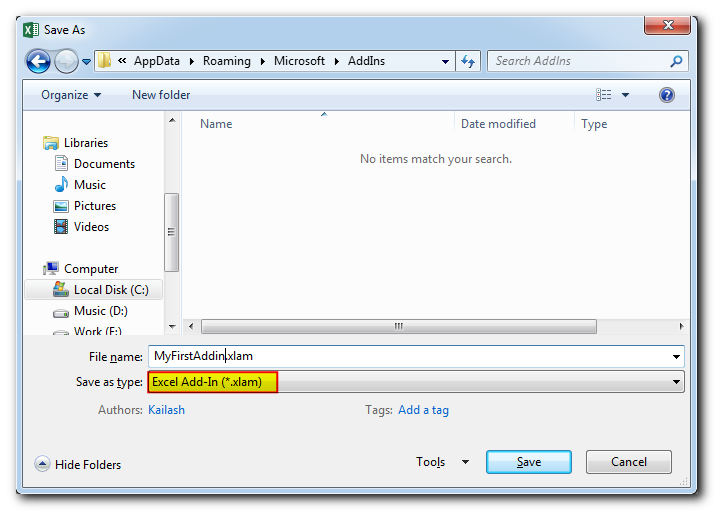
In this article, we are going to talk about how you can create Excel Add-in by following few simple steps. Also we will talk about how you can link the Excel Add-in at your Excel Application open event and add it in Excel Ribbon.

What is an Excel Add-in

In simple words, Excel Add-in helps you to extend the features of Excel application. Using Excel Add-in, you can perform custom actions in Excel such as formatting the data, doing complex calculations which are not possible through Excel formulas, Reading or Writing data in other Excel files and so many more actions.

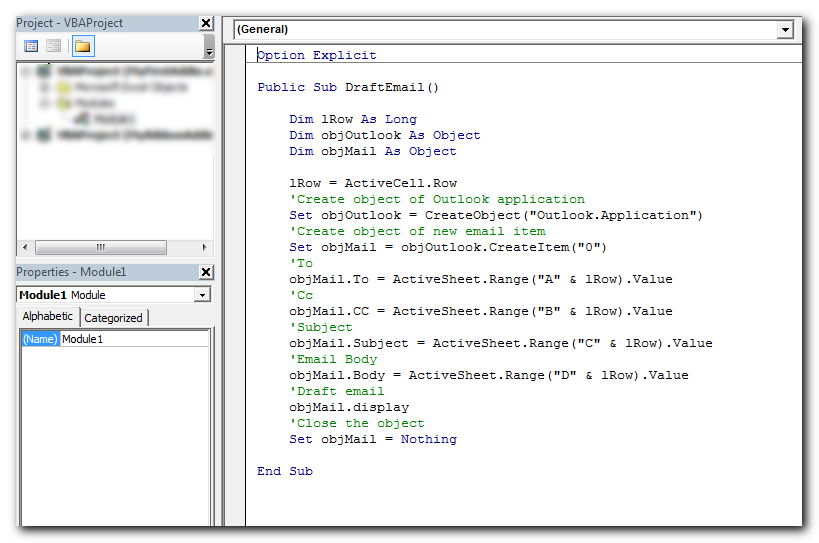
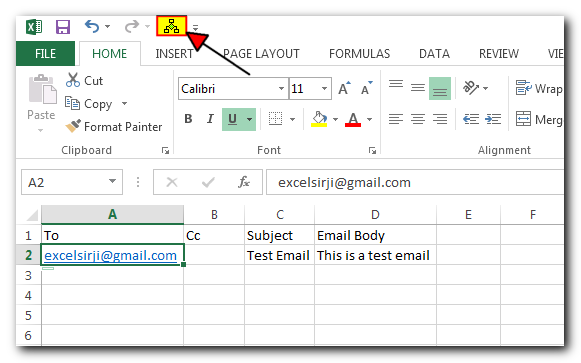
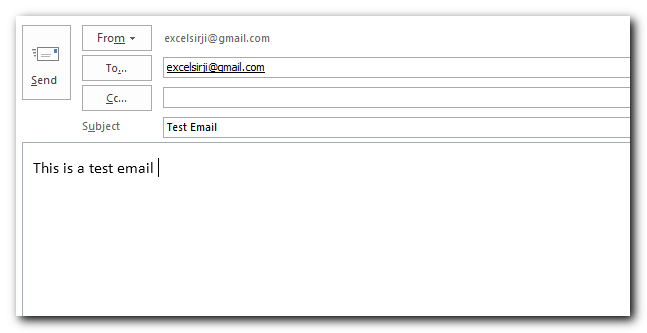
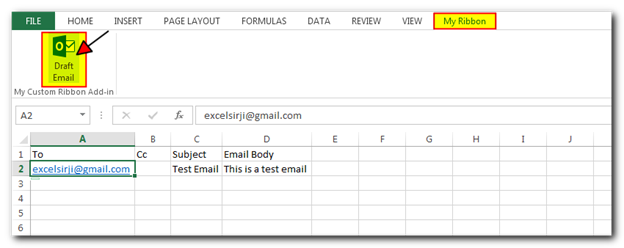
Not just Excel actions, you can also interact with other application’s object models right from your Excel file. Such as sending emails through Outlook, Generating customer letters in word file, Performing File and Folder operations etc.

Complete Excel VBA Course

How You Can Create Your Own Excel Add-in

Few developers thinks that creating an Excel Add-in is very difficult. However Excel Add-in is as simple as creating a normal VBA Macro. Let’s see how you can create an Excel Add-in.

Step 1: Open a new Excel file and start writing your VBA code for the functionalities which you want to be available in your Excel Add-in

Create Excel Add-in

For the purpose of demo, here we have written a code which reads To, Cc, Subject and Email body from the active row of the sheet and displays the drafted Outlook email to user. Excel Add-ins are also compatible with userforms; hence you can also design userforms and allow users to navigate through the Add-in using the forms.

Step 2: This step defines how your Excel Add-in will appear on Excel Menu bar. There are two ways an Excel Add-in may appear on Excel as shown in below screenshots.

First Way:

Create Excel Add-in

Second Way:

Create Excel Add-in

Here our target is to show the simplest way to create Excel Add-in; hence we will be using first way.

If you are looking for ribbon based Excel Add-in then you can directly jump on How you can create Advanced Excel Add-in with Ribbon section.

Now it’s time to save our file. To save any Excel file as Add-in, we need to save it in .xlam (Excel Add-In) format.

Create Excel Add-in

Note that by default Excel Add-ins are saved in AddIns folder under C:\Users\XXXX\AppData\Roaming\Microsoft. However you can save them at other places as well.

Once the file is saved, please close the same before proceeding with next step.

Step 3: Now as we have already saved our Excel Add-in, it’s time to use it. For this, we will open Excel application and go to Options under File menu.

Create Excel Add-in

In ‘Add-Ins’ tab, select ‘Excel Add-ins’ from Manage dropdown and click on ‘Go’ button

Create Excel Add-in

You should now be able to see the add-in we have just saved with ‘MyFirstAddin’ name in the list. If the add-in is not visible in the list, use the browse button to add the same.

Create Excel Add-in

Now the add-in is linked with Excel application open event; hence it will be automatically opened or activated as soon as you open any Excel file.

Step 4: The only step left now is to add the navigation button to run the macro. For this, right click on the menu bar and click on ‘Customize Quick Access Toolbar…’

Create Excel Add-in

Select ‘Macros’ from commands dropdown

Create Excel Add-in

Select the macro named ‘DraftEmail’ and click on ‘Add >>’ button

Create Excel Add-in

Click on ‘OK’ button and you are ready to use the Add-in

Create Excel Add-in

You will notice that a new icon is added in your Excel Quick Access Toolbar

Create Excel Add-in

Step 5: Let’s use the Add-in now. For this, we will add some dummy data in any opened Excel file

Create Excel Add-in

Select any cell in second row and click on the Add-in Macro

Create Excel Add-in

The Add-in macro will read the details from active row of the active Excel file and draft the email like below

Create Excel Add-in

How you can create Advanced Excel Add-in with Ribbon?

Some developers have also requested us to share steps involved to create Add-in with ribbon menu. Let’s have a look at how you can create an Excel Add-in with custom defined menu ribbon.

Step 1: Open a new Excel file and start writing your VBA code for the functionalities which you want to be available in your Excel Add-in

Create Excel Add-in

For the purpose of demo, here we have written a code which reads To, Cc, Subject and Email body from the active row of the sheet and displays the drafted Outlook email to user. Excel Add-ins are also compatible with userforms; hence you can also design userforms and allow users to navigate through the Add-in using the forms.

We are expecting our Add-in with a ribbon named ‘My Ribbon’ and a button to execute the code just like below

Create Excel Add-in

As you can see in the above screenshot, there is a button in the ribbon that is expected to draft the email. For the button to work, we need to add the event handler in our VBA code. For this, we need to add below VBA code in our Add-in

Public Sub Outlook_VBA_Code(rib As IRibbonControl)

    Call DraftEmail

End Sub
Create Excel Add-in

Now it’s time to save our file. To save any Excel file as Add-in, we need to save it in .xlam (Excel Add-In) format.

Create Excel Add-in

Note that by default Excel Add-ins are saved in AddIns folder under C:\Users\XXXX\AppData\Roaming\Microsoft. However you can save them at other places as well.

Once the file is saved, please close the same before proceeding with next step.

Step 2: Next step is to add customized menu in the Excel file. For this, we need to download and install OfficeCustomUIEditorSetup application. You can download it from below link or you can also find it on internet easily.

Once you have downloaded and installed the application, you need to open the Excel file in the application

Create Excel Add-in

Right click on the file name and select ‘Office 2007 Custom UI Part’

Create Excel Add-in

Paste the following XML code in the editor section

<customUI xmlns=”http://schemas.microsoft.com/office/2006/01/customui”>
<ribbon>
<tabs>
<tab id=”CustomRibbon1″ label=”My Ribbon” insertAfterMso=”Data”>
<group id=”Group1″ label=”My Custom Ribbon Add-in”>
<button id=”btnDraftEmail” label=”Draft Email” size=”large” onAction=”Outlook_VBA_Code” imageMso=”MicrosoftOutlook” />
</group>
</tab>
</tabs>
</ribbon>
</customUI>
Create Excel Add-in

You may have noticed that we have set imageMso property to ‘MicrosoftOutlook’ in the above XML code. Here imageMso property is used to set the image/icon of the button. You may refer below links to view the list of available icon names that can be used:

https://bert-toolkit.com/imagemso-list.html

https://www.spreadsheet1.com/office-excel-ribbon-imagemso-icons-gallery-page-01.html

Save the code and exit from the application

Create Excel Add-in

Step 3: Now as we have already saved our Excel Add-in, it’s time to use it. For this, we will open Excel application and go to Options under File menu

Create Excel Add-in

In ‘Add-Ins’ tab, select ‘Excel Add-ins’ from Manage dropdown and click on ‘Go’ button

Create Excel Add-in

You should now be able to see the add-in we have just saved with ‘MyRibbonAddin’ name in the list. If the add-in is not visible in the list, use the browse button to add the same.

Create Excel Add-in

Now the add-in is linked with Excel application open event; hence it will be automatically opened or activated as soon as you open any Excel file.

Step 4: Let’s use the Add-in now. For this, we will add some dummy data in any opened Excel file

Create Excel Add-in

Select any cell in second row and click on the ‘Draft Email’ button under ‘My Ribbon’

Create Excel Add-in

The Add-in macro will read the details from active row of the active Excel file and draft the email like below

Create Excel Add-in

Add Custom Image as Button Icon

Step 1: Open the Excel file in Custom UI Editor Application

Create Excel Add-in

Step 2: Click on ‘Icons’ under Insert menu

Create Excel Add-in

Step 3: Select your custom icon and click on ‘Open’ button

Create Excel Add-in

Step 4: You will notice that the icon is added under customUI.xml

Create Excel Add-in

Step 5: Now it’s time to change the XML code to use the custom icon added by us as button icon. For this, remove the imageMso property of button and set image property to mybutton (icon name)

Create Excel Add-in

Step 6: Save the code and exit from the application

Create Excel Add-in

Step 7: Here is how our ribbon looks like with custom image as button icon

Create Excel Add-in

Sample XML Codes for Creating Checkbox, Dropdown and Other Controls in Ribbon

In the above article, we have used a button to create the ribbon. To help our subscribers, we are sharing few more XML codes for reference which can used to create different types of controls in a Ribbon such as ButtonGroup, CheckBox, ComboBox, DropDown, EditBox, Label, Menu and ToggleButton.

buttonGroup (Button Grouping Container)

Create Excel Add-in
<customUI xmlns="http://schemas.microsoft.com/office/2006/01/customui">
<ribbon>
<tabs>
<tab id="CustomRibbon1" label="My Ribbon" insertAfterMso="Data">
<group id="Group1" label="Button Group">
<buttonGroup id="buttonGroup1">
<button id="button1" imageMso="Bold" onAction="Button1ClickEvent"/>
<button id="button2" imageMso="Italic" onAction="Button2ClickEvent"/>
<button id="button3" imageMso="Underline" onAction="Button3ClickEvent"/>
</buttonGroup>
</group>
</tab>
</tabs>
</ribbon>
</customUI>

checkbox (Check Box)

Create Excel Add-in
<customUI xmlns="http://schemas.microsoft.com/office/2006/01/customui">
<ribbon>
<tabs>
<tab id="CustomRibbon1" label="My Ribbon" insertAfterMso="Data">
<group id="Group1" label="Custom Group">
<checkBox id="checkBox" label="CheckBox" onAction="ClickEvent" />
</group>
</tab>
</tabs>
</ribbon>
</customUI>

comboBox (Combo Box)

Create Excel Add-in
<customUI xmlns="http://schemas.microsoft.com/office/2006/01/customui">
<ribbon>
<tabs>
<tab id="CustomRibbon1" label="My Ribbon" insertAfterMso="Data">
<group id="Group1" label="Custom Group">
<comboBox id="comboBox" label="Combo Box" onChange="ClickMe">
<item id="item1" label="Item 1"/>
<item id="item2" label="Item 2"/>
<item id="item3" label="Item 3"/>
</comboBox>
</group>
</tab>
</tabs>
</ribbon>
</customUI>
Create Excel Add-in
<customUI xmlns="http://schemas.microsoft.com/office/2006/01/customui">
<ribbon>
<tabs>
<tab id="CustomRibbon1" label="My Ribbon" insertAfterMso="Data">
<group id="Group1" label="Custom Group">
<dropDown id="dropDown" label="DropDown" onAction="ClickEvent">
<item id="item1" label="Item 1" />
<item id="item2" label="Item 2" />
<item id="item3" label="Item 3" />
<button id="button" label="Button" onAction="ClickEvent_2" />
</dropDown>
</group>
</tab>
</tabs>
</ribbon>
</customUI>

editBox (Edit Box)

Create Excel Add-in
<customUI xmlns="http://schemas.microsoft.com/office/2006/01/customui">
<ribbon>
<tabs>
<tab id="CustomRibbon1" label="My Ribbon" insertAfterMso="Data">
<group id="Group1" label="Custom Group">
<editBox id="editBox" label="Edit Box" onChange="ClickEvent"/>
</group>
</tab>
</tabs>
</ribbon>
</customUI>

labelControl (Text Label)

Create Excel Add-in
<customUI xmlns="http://schemas.microsoft.com/office/2006/01/customui">
<ribbon>
<tabs>
<tab id="CustomRibbon1" label="My Ribbon" insertAfterMso="Data">
<group id="Group1" label="Custom Group">
<labelControl id="label" label="Label Control" />
</group>
</tab>
</tabs>
</ribbon>
</customUI>
Create Excel Add-in
<customUI xmlns="http://schemas.microsoft.com/office/2006/01/customui">
<ribbon>
<tabs>
<tab id="CustomRibbon1" label="My Ribbon" insertAfterMso="Data">
<group id="Group1" label="Custom Group">
<menu id="menu" label="Menu" imageMso="HappyFace" >
<button id="button1" label="Button 1" imageMso="FileSave" onAction="Bultton1ClickEvent" />
<button id="button2" label="Button 2" imageMso="Bold" onAction="Bultton2ClickEvent" />
<button id="button3" label="Button 3" imageMso="Undo" onAction="Bultton3ClickEvent" />
</menu>
</group>
</tab>
</tabs>
</ribbon>
</customUI>

toggleButton (Toggle Button)

Create Excel Add-in
<customUI xmlns="http://schemas.microsoft.com/office/2006/01/customui">
<ribbon>
<tabs>
<tab id="CustomRibbon1" label="My Ribbon" insertAfterMso="Data">
<group id="Group1" label="Custom Group">
<toggleButton id="toggleButton" label="Toggle Button" onAction="ClickEvent" />
</group>
</tab>
</tabs>
</ribbon>
</customUI>

Download Practice File

You can also practice this through our practice files. Click on the below link to download the practice file.

Recommended Articles

Are you enjoying learning with us, please follow us on Social Media

Similar Posts

Leave a Reply

Your email address will not be published. Required fields are marked *