How to mail merge from Excel to Word
This step-by-step guide will show you how to mail merge from excel to Word using an Excel sheet.
Mail Merge can save you a lot of time when you need to send letters or emails to many people. It helps you create personalized letters, emails, or labels in Word by combining the information from your Excel sheet. This guide gives an overview of the main steps and explains how to do a mail merge from Excel in an easy way
Mail Merge basics
A mail merge might seem difficult, but it’s actually pretty easy.
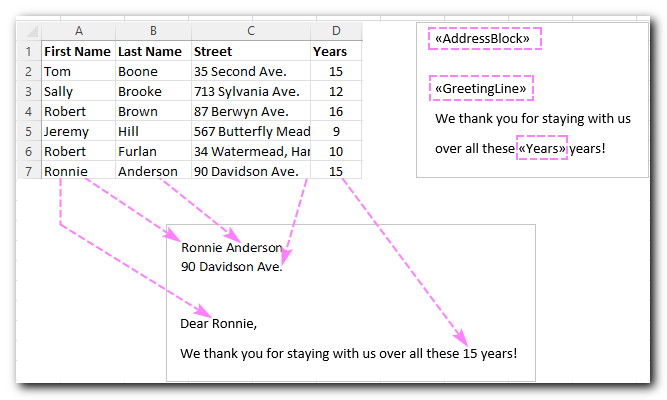
To understand the basics, think of it as using 3 types of documents:
- An Excel file with details about the people you’re sending to, like names, addresses, and emails.
- A Word document with special codes where you want the personal information to go.
- The final Word document that has the personalized letters, emails, labels, or envelopes.
The purpose of mail merge is to combine the data from the Excel file and the Word document to create the final personalized document.
Preparing Excel spreadsheet for mail merge
When you do a mail merge, your Excel file gets linked to your Word document, and Word will take the recipient information straight from the Excel sheet.
Before starting the mail merge in Word, make sure your Excel file has all the details you need, like first name, last name, greeting, zip codes, addresses, and more. If you need to add more information, it’s best to do that before you begin the merge.
Important things to check:
- Your Excel sheet has one row for each person you’re sending to.
- The columns in your spreadsheet match the information you want to use in the mail merge. For example, if you want to use the person’s first name in the letter, make sure you have separate columns for first name and last name. If you want to sort people by state or city, make sure you have a column for each (State, City).
- If your Excel file has zip codes or other numbers with zeros at the beginning, format them as text so the zeros stay in place during the mail merge.
- If you imported your Excel data from a .csv or .txt file, this guide will help you do it right: Importing CSV files into Excel.
- If you want to use your contacts from Outlook, this article might help: How to export Outlook contacts to CSV.
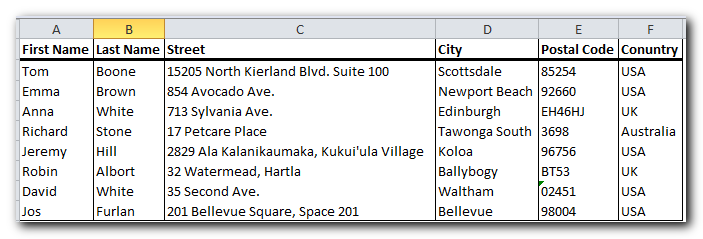
Here’s an example of an Excel sheet that works for a mail merge:
How to mail merge from Excel to Word
Once your Excel spreadsheet is ready and checked, you can start the mail merge. In this example, we’ll be merging letters, but the steps are almost the same for emails.
- Create a Word document. If you’ve already written your letter, you can open that document. If not, create a new one.
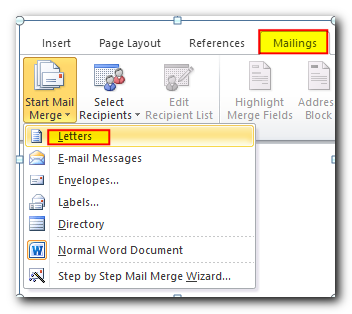
- Choose the type of mail merge you want to do. Go to the Mailings tab, then in the Start Mail Merge group, click on ‘Start Mail Merge’ and choose the type—letters, emails, labels, envelopes, or documents. In this case, we’re choosing ‘Letters
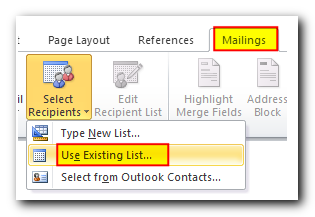
- Select the recipients. On the Mailings tab, in the Start Mail Merge group, click Select Recipients > Use Existing List.
- Connect Excel spreadsheet and Word document. Browse for your Excel file and click Open. Then, select the target sheet and click OK
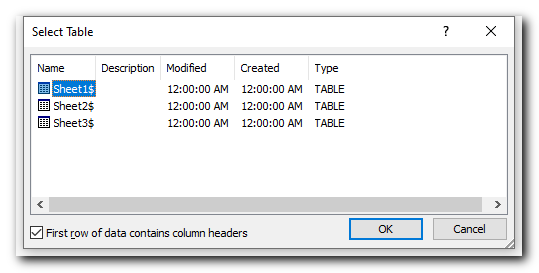
By linking your Excel sheet to the Word document, you make sure that any updates you make to the recipient details in the Excel file will automatically show up in your mail merge.
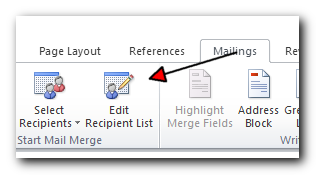
- Refine the recipient list. If you want to exclude certain recipients, then click the Edit Recipient List button in the Start Mail Merge
The Mail Merge Recipients dialog pops up, and you check or uncheck checkboxes to add or remove the recipients from the mail merge.
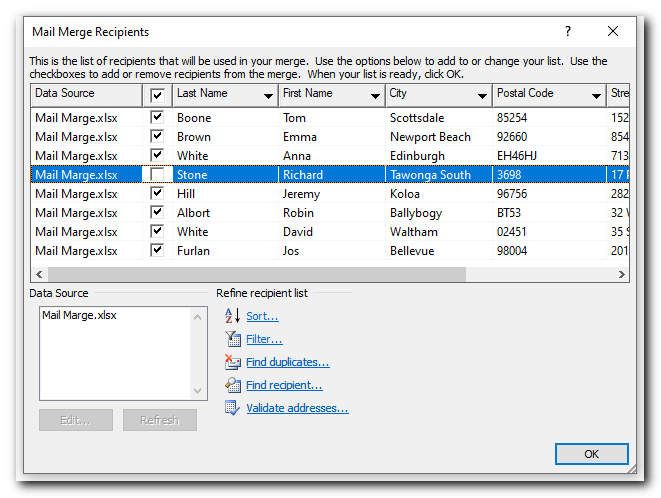
Tips: You can also sort, filter, and remove duplicate names from the recipients list. You can even check if the email addresses are correct by clicking the options under ‘Refine Recipients List.
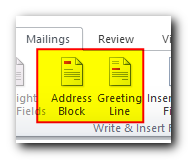
- When the recipients list is finalized, you are ready to start on the letter. Type the text directly in a Word document or copy/paste from an external source. Add Address Block and Greeting Line. Now it’s time to add placeholders for the Address Block and Greeting Line for Mail Merge to know exactly where to place that data. To add a placeholder, click the corresponding button on the Mailings tab, in the Write & Insert Fields
When you insert a merge field, a box will pop up with different options based on the field. Choose the options that work best for you, check the results in the Preview section, and click OK. To move between recipients, use the right and left arrows.
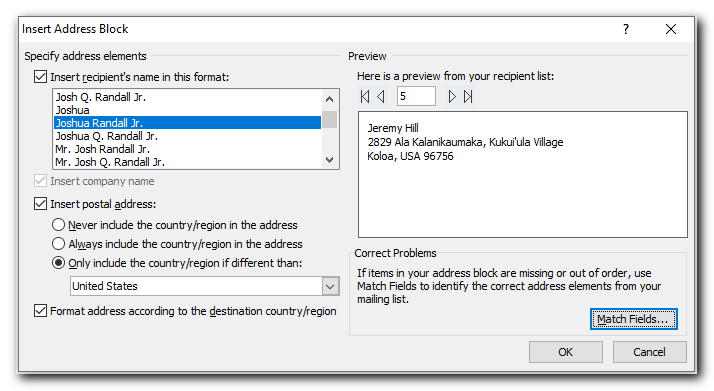
Tip. If Word pulls wrong information from the Excel file, click the Match Fields button to match a specific field.
When done, the merge field placeholders will appear in your document like shown in the screenshot below:
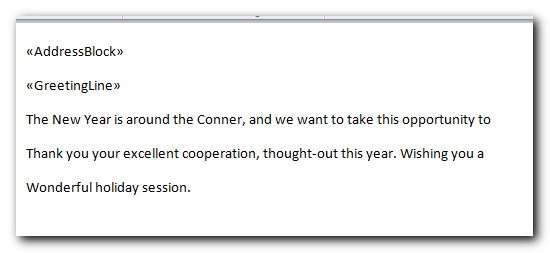
- Insert merge fields. In some cases, adding only the Address block and Greeting line will suffice. When the letter is printed out, all the copies will be identical except for the recipients’ names and addresses.
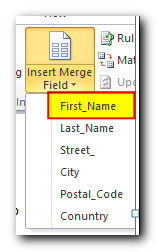
Sometimes, you might want to add more merge fields to make your letters more personal. To do this, place your cursor where you want the personal information to go, click the ‘Insert Merge Field’ button on the toolbar, and select the field from the drop-down list.
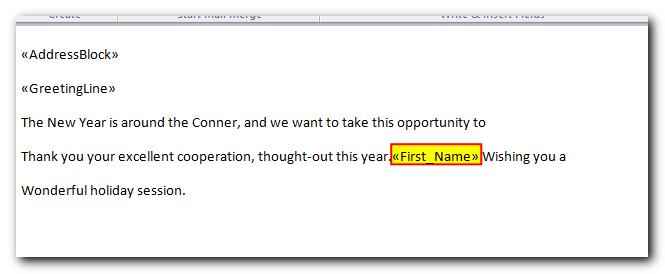
If a merge field is inserted within the text, make sure there are spaces on both sides of it:
- Preview the results. To check that the recipient’s details show up correctly in the letter, click the ‘Preview Results’ button on the Mailings tab. Then, use the left and right arrows to move through the recipients
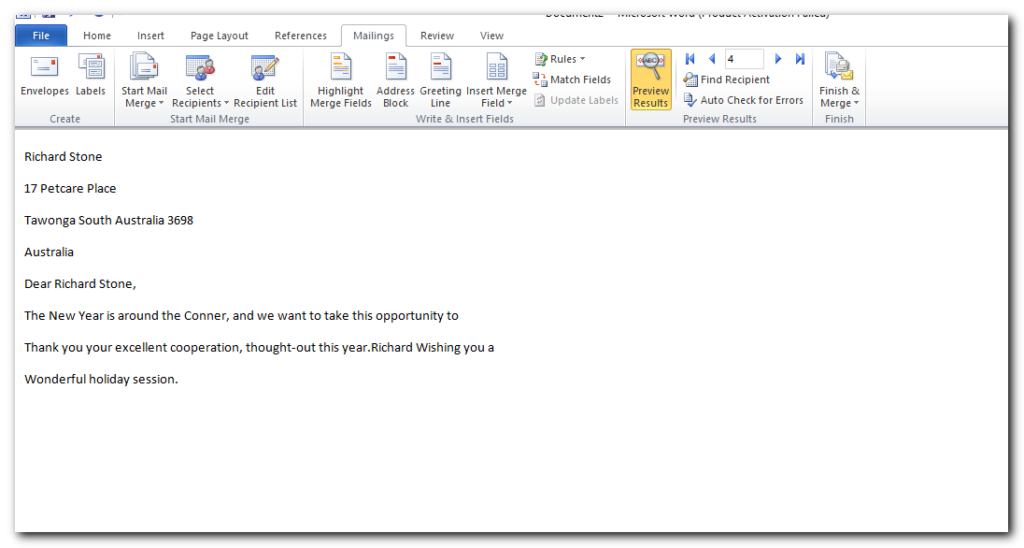
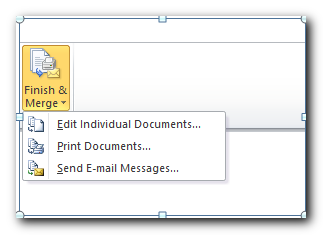
- Finish the mail merge. If you’re happy with all the previews, go to the Finish group and click the ‘Finish & Merge’ button. You can choose to print the letters or send them as emails. If you want to make changes before printing or emailing, click ‘Edit Individual Documents.’ A new document will open, and you can make changes to each letter.
- Save the mail merge document. Save the mail merge results as a usual Word document by clicking the Save button or pressing the Ctrl + S shortcut.
Once saved, the file will stay connected to your Excel mailing list. When you want to use the mail merge document again, open it and click Yes when Word prompts you to retain that connection
Using step-by-step Mail Merge Wizard
Besides the options on the toolbar, you can also use the Mail Merge Wizard, which has the same features.
To start the wizard, go to the Mailings tab and click ‘Start Mail Merge,’ then choose ‘Step-by-Step Mail Merge Wizard.
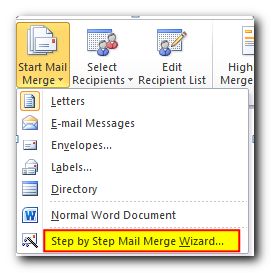
Once clicked, the Mail Merge pane will open on the right side of your document and walk you through the process step-by-step.
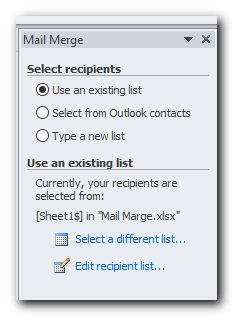
I think using the toolbar is easier because it lets you access the exact feature you need right away. However, if you’re doing a mail merge for the first time, the step-by-step help from the wizard can be very useful
How to get mail merge to match fields
For Word Mail Merge to recognize fields correctly, you need to be very specific with the column names in your Excel file. This is especially true for the Address Block and Greeting Line features.
For the Name fields, ‘First Name’ and ‘Last Name’ work well. But other column names might not match correctly.
For the Address fields, use the full words like ‘Address,’ ‘City,’ ‘State,’ ‘Postal Code,’ or ‘Zip Code.’
If your Excel data source has different column names, you’ll need to match the fields by hand. Here’s how:
- In the Insert Address Block or Insert Greeting Line dialog box, click the Match Fields (This button is also available on the Mailings tab, in the Write & Insert Fields group.)
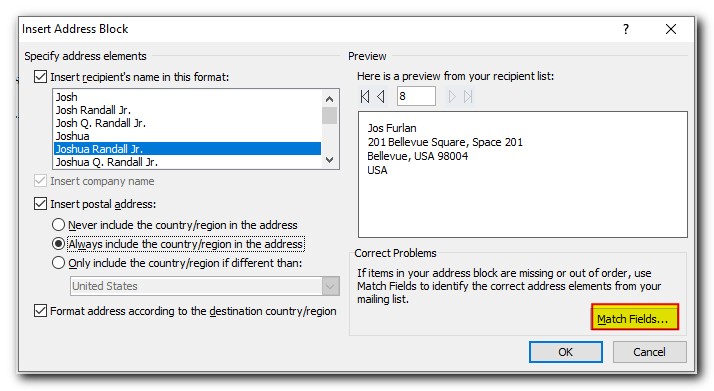
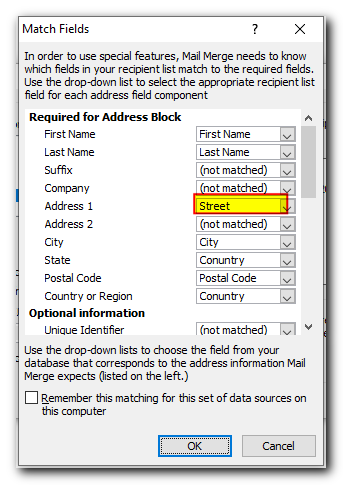
- In the Match Fields dialog box that pops up, you will see the list of fields required for a given block. To match a specific field, click the drop-down arrow next to it, and pick the correct field from the list.
Mail Merge shortcuts
If you do a mail merge in Word on a regular basis, learning a few shortcuts can save you quite a lot of time and make you more productive.
Shortcut | Description |
Alt+F9 | Switch between all field codes and their results in a mail merge document. |
Shift+F9 | Display the coding of the selected field. |
F9 | Update the selected filed. Place the cursor anywhere in the field and press F9 to update it. |
F11 | Go to the next field. |
Shift+F11 | Go to the previous field. |
Alt+Shift+E | Edit the mail merge document. Note, this will break the connection between your Excel file and Word document, as a result your mail merge source won’t be automatically updated any longer. |
Alt+Shift+F | Insert a merge field from your mail merge source. |
Alt+Shift+M | Print the merged document. |
Ctrl+F9 | Insert an empty field. |
Ctrl+F11 | Lock a field. The field results won’t be updated when the information in the Excel source file changes. |
Ctrl+Shift+F11 | Unlock a field. The field results will be updated again. |
Ctrl+Shift+F9 | Unlink a field. The field will be permanently removed from a document, replaced by its current value and from then on treated as normal text. |
Alt+Shift+D | Insert the DATE field that displays the current date. |
Alt+Shift+T | Insert the TIME field that displays the current time. |
Alt+Shift+P | Insert the PAGE field that displays the page number. |
Alt+Ctrl+L | Insert LISTNUM field. |
Hopefully, this information has been helpful, and now you know how to perform mail merge from Excel to Word correctly. Thank you for reading!


