How to create external reference in Excel
This quick tutorial explains the basics of external references in Excel and shows how to reference another sheet or workbook in your formulas.
When working in Excel, you might need to get data from another worksheet or even a different Excel file. Can you do that? Yes, you can! You just need to create a link between the sheets (whether they are in the same workbook or in different workbooks) by using something called an external cell reference or link.
An external reference in Excel points to a cell or range of cells outside your current worksheet. The main advantage is that if the referenced cell changes, your formula will automatically update with the new value.
External references are similar to regular cell references, but there are some key differences. In this tutorial, we’ll cover the basics and show you how to create different types of external references with clear steps, screenshots, and formula examples.
Table of Contents
How to reference another sheet in Excel
To refer to a cell or a group of cells in another worksheet within the same workbook, type the name of the worksheet, then an exclamation mark (!), and finally the cell address.
In simpler terms, when you want to point to a cell in a different sheet in Excel, use this format:
Reference to an individual cell:
Sheet_name!Cell_address
For example, to refer to cell A1 in Sheet2, you type Sheet2!A1.
Reference to a range of cells:
Sheet_name!First_cell:Last_cell
For example, to refer to cells A1:A10 in Sheet2, you type Sheet2!A1:A10.
Note. If the worksheet name includes spaces or non-alphabetical characters, you must enclose it in single quotation marks. For example, an external reference to cell A1 in a worksheet named Project Milestones should read as follows: ‘Project Milestones’!A1.
In a real-life formula, which multiplies the value in cell A1 in ‘Project Milestones’ sheet by 10, an Excel sheet reference looks like this:
=’Project Milestones’!A1*10
Creating a reference to another sheet in Excel
When creating a formula that refers to cells in another worksheet, you could manually type the sheet name, followed by an exclamation mark (!) and the cell address. However, this can be slow and might lead to mistakes.
A quicker and easier way is to click on the cell(s) in the other sheet that you want to include in your formula. Excel will automatically add the correct reference for you. To let Excel do this, follow these steps:
Begin by typing your formula in the cell where you want the result or in the formula bar.
When you need to refer to a cell or range in another worksheet, switch to that sheet and click on the cell(s) you want to include.
Finish typing your formula, then press Enter to complete it.
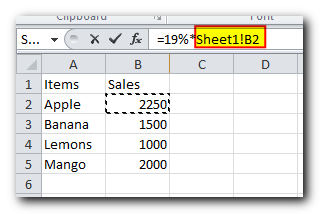
For example, if you have a list of sales figures in sheet Sales and you want to calculate the Value Added Tax (19%) for each product in another sheet named VAT, proceed in the following way:
- Start typing the formula =19%* in cell B2 on sheet VAT.
Switch to sheet Sales, and click on cell B2 there. Excel will immediately insert an external reference to that cell, as shown in the following screenshot:

- Press Enter to complete the formula.
Note: When you use the method above to reference another sheet, Excel automatically uses a relative reference (without the $ sign). This means the reference will change when you copy the formula to other cells.
For example, if you copy the formula to other cells in column B on the VAT sheet, the cell references will update for each row, and the VAT for each product will be calculated correctly.

This is how you reference another sheet in Excel. And now, let’s see how you can refer to cells from a different workbook.
How to create external reference in excel with another workbook
In Microsoft Excel formulas, how a reference to another workbook looks depends on whether that workbook is open or closed.
If the workbook is open, the reference will look one way. If it’s closed, the reference will look slightly different.
External reference to an open workbook
When the source workbook is open, an Excel reference includes the workbook name in square brackets (with the file extension), followed by the sheet name, an exclamation mark (!), and the cell or range you are referencing.
In simpler terms, for an open workbook, the reference format looks like this:
[Workbook_name]Sheet_name!Cell_address
For example, here’s an external reference to cells B2:B5 on sheet Jan in the workbook named Sales.xlsx:
[Sales.xlsx]Jan!B2:B5
If you want, say, to calculate the sum of those cells, the formula with the workbook reference would look as follows:
=SUM([Sales.xlsx]Jan!B2:B5)
External reference to a closed workbook
When you reference another workbook in Excel, that workbook doesn’t need to be open. If the source workbook is closed, you must include the full file path in your reference.
For example, if you want to add up cells B2 in the “Jan” sheet from a workbook called Sales.xlsx that is saved in the “Reports” folder on drive D, the formula would look like this:
=SUM(D:\Reports\[Sales.xlsx]Jan!B2:B5)
- File Path: This shows the location of your Excel file, including the drive and folder where it’s stored (for example, D:\Reports).
- Workbook Name: This includes the file’s name and extension (like .xlsx, .xls, or .xlsm) and is always inside square brackets. In the example, it’s [Sales.xlsx].
- Sheet Name: This is the name of the sheet, followed by an exclamation mark (!) to show where the cell(s) are located (e.g., Jan!).
- Cell Reference: This points to the specific cell or range of cells that your formula is using.
If you’ve created an reference to another workbook when that workbook was open, and after that you closed the source workbook, your external workbook reference will get updated automatically to include the entire path.
Note. If either the workbook name or sheet name, or both, include spaces or any non-alphabetical characters, you must enclose the path in single quotation marks. For example:
=SUM(‘[Year budget.xlsx]Jan’!B2:B5)
=SUM(‘[Sales.xlsx]Jan sales’!B2:B5)
=SUM(‘D:\Reports\[Sales.xlsx]Jan sales’!B2:B5)
Making a reference to another workbook in Excel
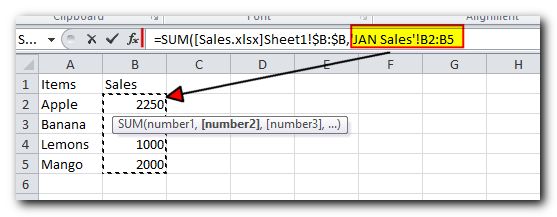
Just like when creating a formula that references another sheet, you don’t have to manually type a reference to a different workbook.
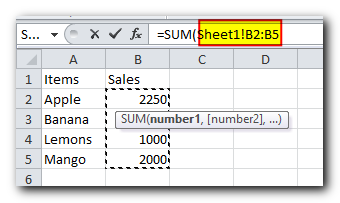
Simply switch to the other workbook while entering your formula, then click on the cell or range of cells you want to reference. Excel will handle the rest for you.

Notes
When you create a reference to another workbook by selecting the cell(s), Excel automatically adds absolute cell references, which include dollar signs ($). If you want to copy the new formula to other cells, make sure to remove the dollar signs to change them to relative or mixed references, depending on what you need.
If selecting a cell in the other workbook doesn’t create a reference in the formula, it may be because the two files are open in different instances of Excel. To check this, open Task Manager and see how many Excel instances are running. If you see more than one, expand each instance to see which files are open. To fix the issue, close one of the files (and its instance), then reopen it from the other file.
Reference to a defined name in the same or another workbook
To make an Excel external reference more compact, you can create a defined name in the source sheet, and then refer to that name from another sheet that resides in the same workbook or in a different workbook.
Creating a name in Excel
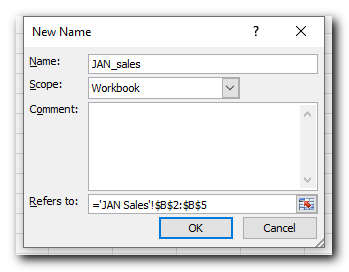
To create a name in Excel, first select all the cells you want to include. Then, you can either go to the Formulas tab, find the Defined Names group, and click the Define Name button, or you can press Ctrl + F3 and click New.
In the New Name dialog box, type the name you want (just remember that you can’t use spaces in Excel names), and make sure the correct range of cells is shown in the Refers to field.
For example, this is how to create the name Jan_sales for the cells B2 in the Jan sheet:

Once you create a name, you can use it in your external references in Excel. The format for these references is much simpler than the format for referencing a sheet or workbook, which makes formulas with named references easier to understand.
Note: By default, Excel names are created at the workbook level, as shown in the Scope field in the screenshot above. However, you can also create a name for a specific worksheet by selecting the appropriate sheet from the Scope drop-down list.
The scope of a name is very important for Excel references because it determines where the name can be used.
It’s recommended that you always create workbook-level names (unless you have a specific reason not to), because they significantly simplify creating Excel external references, as illustrated in the following examples.
Referencing a name in another sheet in the same workbook
To reference a global workbook-level name in the same workbook, you simply type that name in a function’s argument:
=Function(name)
For example, to find the sum of all the cells within the Jan_sales name that we created a moment ago, use the following formula:
=SUM(Jan_sales)
To reference a local worksheet-level name in another sheet within the same workbook, you need to precede the name with the sheet name followed by an exclamation mark:
=Function(Sheet_name!name)
For example:
=SUM(Jan!Jan_sales)
If the sheet names includes spaces or mon-alphabetic chars, remember to enclose it in single quotes, e.g.:
=SUM(‘Jan report’!Jan_Sales)
Referencing a name in another workbook
A reference to a workbook-level name in a different workbook consists of the workbook name (including the extension) followed by an exclamation point, and the defined name (named range):
=Function(Workbook_name!name)
For example:
=SUM(Sales.xlsx!Jan_sales)
To reference a worksheet-level name in another workbook, the sheet name followed by the exclamation point should be included as well, and the workbook name should be enclosed in square brackets. For example:
=SUM([Sales.xlsx]Jan!Jan_sales)
When referencing a named range in a closed workbook, remember to include the full path to your Excel file, for example:
=SUM(‘C:\Documents\Sales.xlsx’!Jan_sales)
How to create an Excel name reference
If you’ve created several names in your Excel sheets, you don’t need to memorize them. To easily insert a name reference in a formula, follow these steps:
- Select the cell where you want the result, type an equal sign (=), and start your formula.
- When you need to insert a name reference, do one of the following:
- If you’re using a workbook-level name from another workbook, switch to that workbook. If the name is in a different sheet within the same workbook, you can skip this step.
- If you’re using a worksheet-level name, go to that specific sheet, either in the current workbook or another one.
- Press F3 to open the “Paste Name” dialog box, select the name you want, and click OK.
- Finish typing your formula or calculation and press the Enter key.
Now that you know how to create an external reference in Excel, you can take a benefit from this great ability and use data from other worksheets and workbooks in your calculations. I thank you for reading and look forward to seeing you on our blog next week!


