How to convert CSV file to Excel (open or import)
This tutorial shows how to quickly change CSV file to Excel in any version, from 365 to 2007, without common problems.
There are two main ways to move a CSV file to Excel: by opening it directly or by importing it as external data. This article gives step-by-step instructions for both methods, explains their pros and cons, and highlights potential problems with tips to fix them
Table of Contents
Convert CSV file to Excel by opening it
To get data from a CSV file into Excel, you can open it straight from an Excel workbook or through Windows Explorer. No matter which way you choose, remember:
- Opening a CSV file in Excel doesn’t change it to an Excel format like .xlsx or .xls. The file will still be a .csv.
- Excel files can only have up to 1,048,576 rows and 16,384 columns.
How to open CSV file in Excel
A CSV file made in another program can still be opened in Excel using the regular Open command.
In Excel, go to the File tab and click Open, or just press Ctrl + O. In the Open window, choose ‘Text Files (.prn;.txt;*.csv)’ from the drop-down list in the bottom right corner
- Find the CSV file, then double-click to open it. A CSV file (.csv) will open right away in a new workbook.
- For a text file (.txt), Excel will launch the Import Text Wizard. For more details, check the section on Importing CSV to Excel.
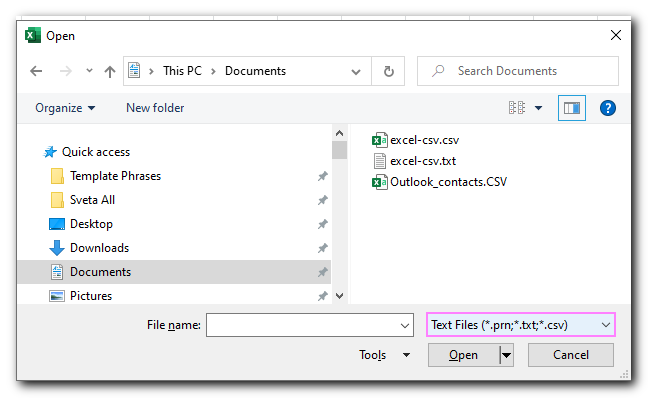
- Browse for the CSV document, and then double-click it to open.
A comma separated values file (.csv) will be opened in a new workbook straight away.
For a text file (.txt), Excel will start the Import Text Wizard
How to open CSV file from Windows Explorer
The quickest way to open a .csv file in Excel is to double-click it in Windows Explorer. This will open your file in a new workbook right away.
This only works if Microsoft Excel is set as the default app for .csv files. You’ll know it’s set if you see the green Excel icon next to .csv files in Windows Explorer.
If another app is set as the default, right-click the file, select Open with… > Excel.
To make Excel the default program for CSV files:
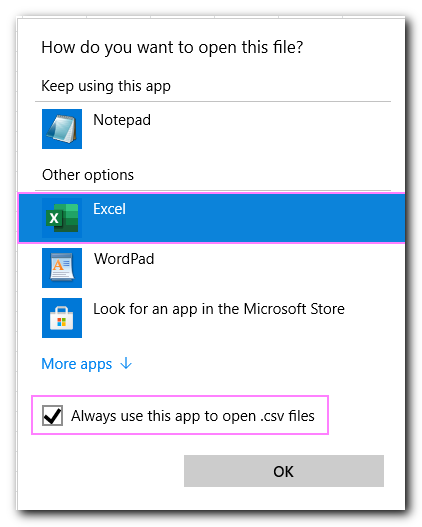
- Right-click any .csv file in Windows Explorer, then choose Open with… > Choose another app.
- Under Other options, select Excel, check the box that says ‘Always use this app to open .csv files,’ and click OK.
Convert CSV to Excel by importing it
With this method, you can bring data from a .csv file into an existing or new Excel worksheet. Unlike just opening the file, this method changes the format from .csv to .xlsx (for Excel 2007 and newer) or .xls (for Excel 2003 and older).
There are two ways to import data:
- Using the Text Import Wizard (in all versions of Excel)
- Creating a Power Query connection (in Excel 2016 to Excel 365)
How to import CSV into Excel with Text Import Wizard
First, it’s important to know that the Text Import Wizard is an old feature. Starting in Excel 2016, it was moved from the ribbon to Excel Options.
If you don’t see the Text Import Wizard in your version, you have two choices:
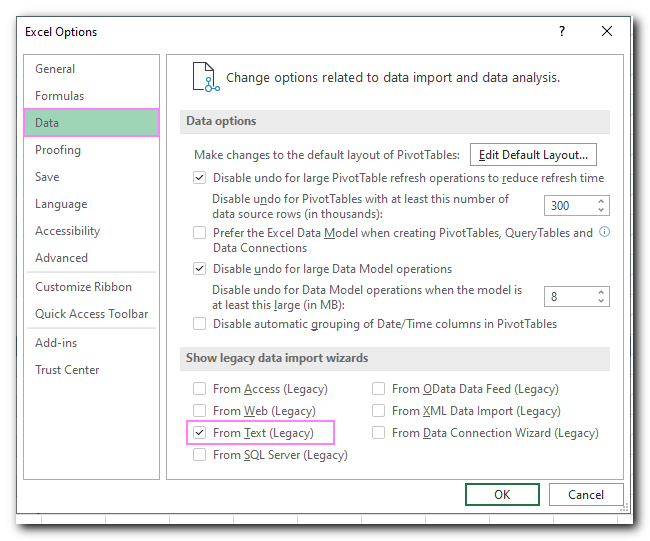
- Turn on the ‘From Text (Legacy)’ feature.
- Make Excel use the Import Text Wizard automatically. To do this, change the file extension from .csv to .txt, open the text file in Excel, and follow the steps in the wizard.
To import a CSV file to Excel:
- In Excel 2013 and earlier, go to the Data tab > Get External Data group, and click From Text.
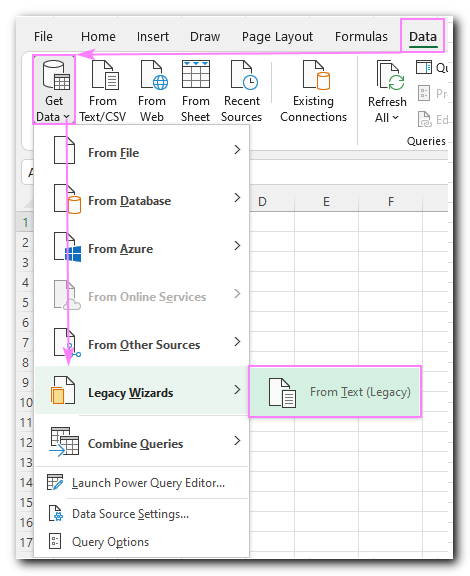
In Excel 2016 and later, go to the Data tab > Get & Transform Data group, and click Get Data > Legacy Wizards > From Text (Legacy).
Note: If the ‘From Text’ wizard isn’t showing, make sure it’s turned on. If ‘Legacy Wizards’ is still grayed out, select an empty cell or open a new worksheet and try again.
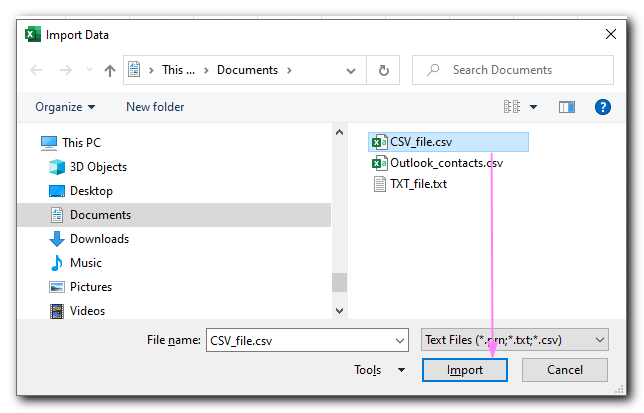
- In the Import Text File window, find the .csv file you want to import, select it, and click the Import button (or just double-click the file).
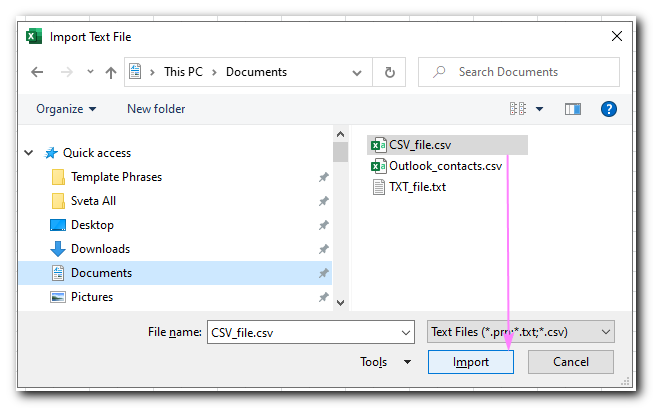
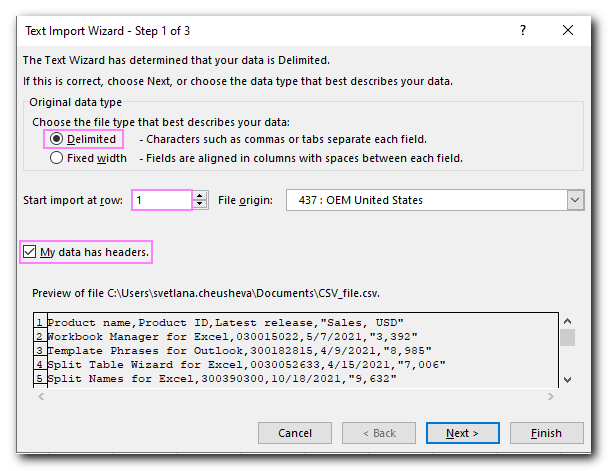
- The Text Import Wizard will start, and you follow its steps. First, you choose:
The Delimited file type
The row number to start import at (normally, row 1)
Whether your data has headers
The preview window in the lower part of the wizard shows a few first entries from your CSV file.
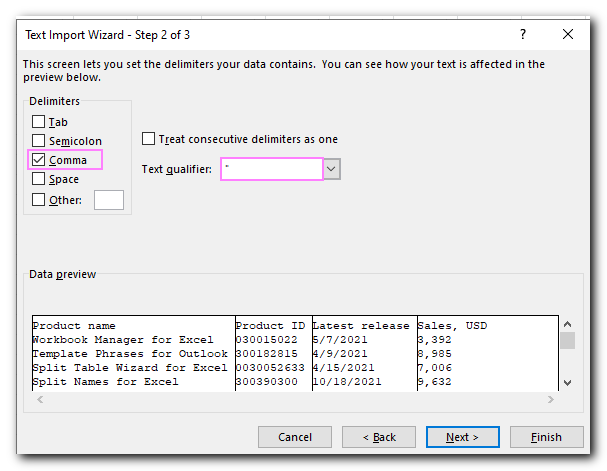
- Choose the delimiter and text qualifier.
A delimiter is the character that separates values in your file. Since a CSV file uses commas to separate values, choose ‘Comma.’ For a TXT file, you would usually choose ‘Tab.’
A text qualifier is the character that surrounds values in the file. Everything between two qualifier characters will be imported as one value, even if it has the delimiter inside.
Usually, you pick the double quote symbol (“). To check, click Back and look at the preview of your CSV file to see what character surrounds the values.
For example, numbers with commas as thousands separators, like “3,392”, are wrapped in double quotes. This ensures they are imported into one cell. If you don’t set the double quote as the text qualifier, the numbers before and after the comma would end up in two separate columns.
To make sure your data is imported correctly, carefully check the Data preview before clicking Next.
Tips and notes:
- If more than one consecutive delimiter is present in your CSV file, then select the Treat consecutive delimiters as oneoption to prevent empty cells.
- If the preview shows all datain one column, that means a wrong delimiter is selected. Change the delimiter, so that the values are displayed in separate columns.
- Define data format. The default is General– it converts numeric values to numbers, date and time values to dates, and all remaining data types to text.
To set a different format for a specific column, click on that column in the Data Preview, then choose one of the options under Column data format:
- To keep numbers with leading zeros (like 00123), choose ‘Text’ format.
- To display dates correctly, choose ‘Date’ format, then pick the correct format from the drop-down menu.
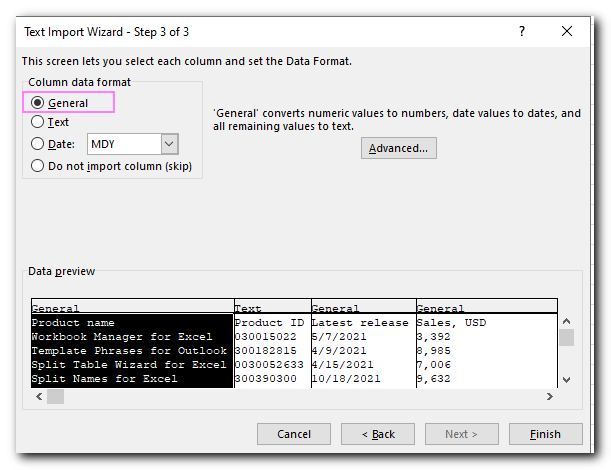
Once you’re satisfied with the Data preview, click the Finish button
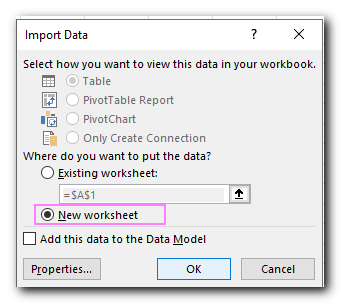
- Choose whether to import data to an existing worksheet or a new one, and click OK.
Tips and notes:
- To configure some advanced options such as refresh control, layout and formatting, click Properties…in the above dialog box.
- If some imported data are displayed incorrectly, you can change the format with the help of Excel’s Format Cells feature.
How to enable Text Import Wizard in Excel 2016 - Excel 365
To activate the Text Import Wizard in modern versions of Excel, this is what you need to do:
- Click the Filetab, and then click Options > Data.
- Under Show legacy data import wizards, select From Text (Legacy), and click OK.
Once enabled, the wizard will appear on the Data tab, in the Get & Transform Data group, under Get Data > Legacy Wizards.
How to transfer CSV to Excel by connecting to it
In Excel 365, Excel 2021, Excel 2019, and Excel 2016, you can import data from a text file using Power Query. Here’s how to do it:
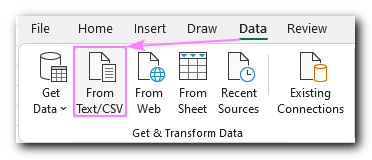
- Go to the Data tab.In the Get & Transform Data group, click on From Text/CSV.
2. In the Import Data dialog box, select the text file of interest, and click Import.
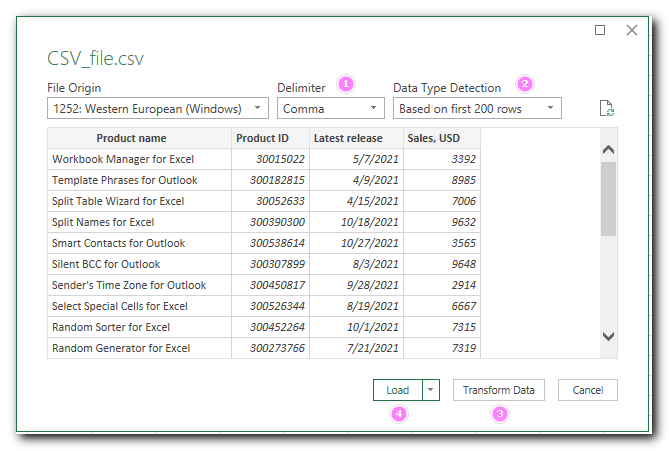
3. In the preview dialog box, the following options are available to you
Delimiter: Choose the character that separates the values in your text file.
- Data Type Detection: You can let Excel automatically figure out the data type for each column based on the first 200 rows (default) or the entire dataset. You can also choose not to detect data types, which will keep the data in its original Text format.
- Transform Data: This option opens the Power Query Editor, where you can edit the data before bringing it into Excel. Use this feature to set the desired format for specific columns.
- Load: This controls where to import the data. To import the CSV file into a new worksheet, select Load. If you want to send the data to an existing or new sheet as a table, PivotTable/PivotChart, or just create a connection, choose Load To.
Clicking the Load button will import the CSV data in the table format like this one:
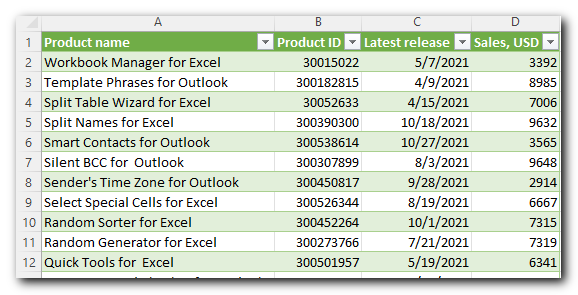
Clicking the Load button will import the CSV data in the table format like this one:
Converting CSV to Excel: opening vs. importing
When Microsoft Excel opens a .csv file, it uses your default settings to decide how to display each column of text data. This usually works well.
However, if your text file has specific values and you want to control how they appear in Excel, it’s better to import the file instead of just opening it. Here are some common reasons to import:
- The CSV file uses different delimiters.
- The CSV file has different date formats.
- Some numbers have leading zeros that you want to keep.
- You want to see a preview of how your CSV data will look in Excel.
- You want more flexibility in how the data is imported.
How to save CSV file in Excel
Whichever conversion method you used, you can save the resulting file like you normally would.
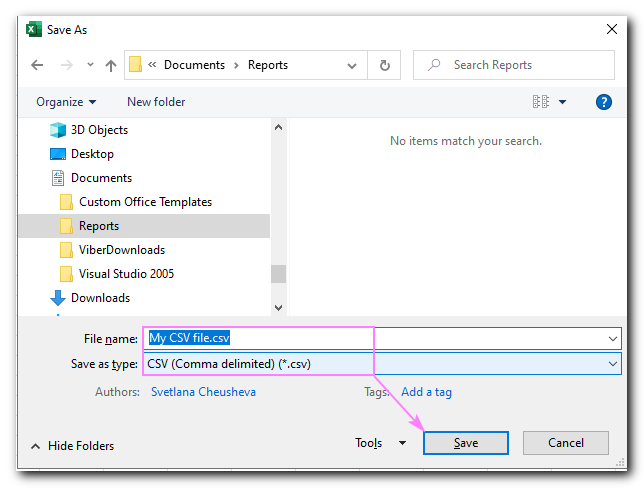
- In your Excel worksheet, click File> Save as.
- Browse for the folder where you want to save the file.
- To save as an Excel file, select Excel Workbook (*.xlsx)from the Save as type drop-down menu. To save as a comma-separated file, select CSV (Comma delimited) or CSV UTF-8.
- Click Save
If you saved a CSV file in .xls format in older versions of Excel, you might see the error message ‘The file is damaged and cannot be opened’ in Excel 2010 and later. Try these tips to open a corrupted .xls file.
How to open multiple CSV files in Excel at once
As you may know, Microsoft Excel lets you open several workbooks at the same time using the Open command. This also works for CSV files.
To open multiple CSV files in Excel, follow these steps:
- In Excel, click File > Open or press Ctrl + O together.
- Click the Browse button and go to the folder where your files are stored.
- In the drop-down list next to the File name box, select Text Files (*.prn, *.txt, *.csv).
- Select your text files:
- To select files that are next to each other, click the first file, hold down the Shift key, and then click the last file. This will select all the files in between.
- To select files that are not next to each other, hold down the Ctrl key and click each file you want to open.
- After selecting the files, click the Open button.
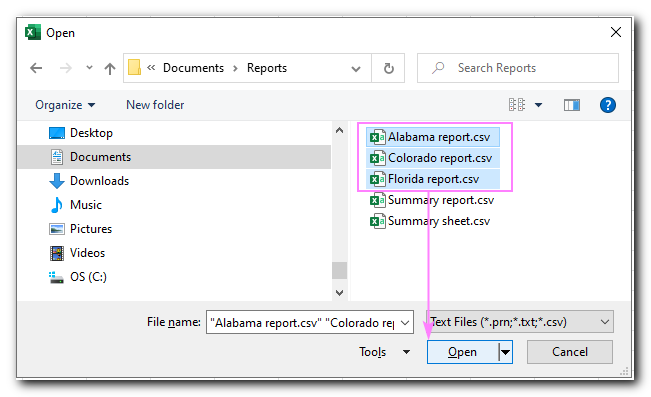
In Windows Explorer, you can right-click the selected files and choose Open from the menu.
This method is easy and fast, but it has one downside: it opens each CSV file as a separate workbook. This can be inconvenient because switching between multiple Excel files can be tiring. Instead, you can import all the files into the same workbook. For detailed instructions, check out: How to merge multiple CSV files into one Excel workbook.
Now, you should be able to convert any CSV files to Excel easily. for more article you can refer. Thank you for your patience if you read this tutorial to the end!


